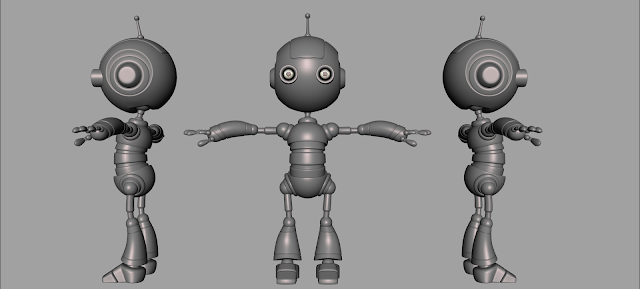
Concept Robot Rig - CAMBOT
Welcome back to 4th Semester Character Rigging.
In this first assignment of character rigging..
We are asked to rig a Concept Robot.

Let's start rigging with Concept Robot.
Modeling is done by our Faculty.
Let's Start With LEG - RIG (click this to see tutorial)
►While Rigging we should remember some rules 1.we should create joints in center of geometry. So select joint tool and axis should be at XYY and start creating joints in center of the geometry
►After creating jk8nts we should check its LRA
1.x should be pointed towards its parent.
2. Y and z all axis should face in the same direction.
After checking all this... Now we have start renaming joins according to the character.

►Create IK Handle controls all joint.
►RPS ( Hip_jnt to Ankel_jnt) name it as cambot_R_Ankle_IK.
►SPS ( Ankle_jnt to Ball_jnt ) (Ball_jtn to Toe_jnt) and name it as cambot_R_Ball_IK and cambot_R_Toe_IK.
►Grouping:-
a. Select Ankle ik and ball ik -> group it and name it as heel lift group and snap the pivot to ball joint.
b. Select toe ik -> group it to itself and name it as toe group and snap the pivot to ball joint.
c. Select heel lift group and shift select toe group -> group it and name it as toe pivot group and snap the pivot to toe joint.
d. Select toe pivot group -> group it and name it as toe Tap group and snap the pivot to toe joint.
e. Select toe tap group -> group it and name it as bank L group and snap the pivot to right center of the foot.
f. Select bank L group -> group it and name it as bank R group and snap the pivot to left center of the foot.
g. Select bank R group -> group it and name it as Heel group and snap the pivot to Ankle Joint.
h. Select Heel group -> group it and name it as leg Constraint grp and snap the pivot to Ankle Joint.

►Now we should create Control curves for Foot_ctrl & knee_ctrl.

•Foot_ctrl pivot will at Ankle_jnt and Knee_ctrl pivot will its center only.
•Select Foot Ctrl and Add Attributes
a. Heel lift
b. Heel
c. Toe
d. Toe Pivot
e. Toe tap
f. Bank

Go to connection editor->
a. Load foot control to left -> select required attribute from foot control -> load the group from outliner which relates to the selected attribute.
b. Select the attribute and click of the required axis of the group to get desired movements.•Limit the attributes as per Rig Requirements.
•Select knee control shift select Ankle ik -> Pole vector constraint.
•Select the character geometry and create a relation between its respective joint by parent constraining.
•Create groups for Joints, Cntrl, ik, etc -> Group all created groups -> group it -> name it as cambot_transform_R_Leg_GRP.

Upper_Body(click this to see tutorial)
►Create Joints as per the object requirement
►Check all the basic rules of rigging. Naming Respective.

►After Creating Joints Now We need to Create Curves to Controls it.
►After Creating CC don't forgot to Freeze Transform and Delete History and pivot location at Respective JOINT

1.) Now, We need to Create Relationship between Curves and Joints.
- Cog_ctrl to Root_jnt (Parent Constrain )
- LowerNeck_ctrl to LowerNeck_jnt (Orient Constrain )
- UpperNeck_ctrl to UpperNeck_jnt (Orient Constrain )
- LensRotate_ctrl to LensBase_jnt (Orient Constrain )
- LensMove_ctrl to LensMid_jnt (Point Constrain )
2.) Now we need to build relaton ship b/w Curves to Curves.
Select all the curves one by one and group it to itself and rename and change pivot to its respective JNT.
- COG_ctrl to LowerNeck_ctrl(group) [Parent Constrain]
- LowerNeck_ctrl to UpperNeck_ctrl(group) [Parent Constrain]
- COG_ctrl_ctrl to LensRotate_ctrl(group) [Parent Constrain]
- LensRotate_ctrl to LensMove_ctrl(group) [Parent Constrain]
3.) Now we need to Create Relationship b/w Joints to Geometry.
Select the character geometry and create a relation between its respective joint by parent constraining.
►Limit the attribute values as per requirement.
and we are done rigging upper body.

Face Rig(click this to see tutorial)
1. Create 3 Curves in Face. (Master_Eye_ctrl , R/L_Eye_ctrl)

1.) Select EyeBase_jnt and Eye(group) and Parent Constrain.
2.) Eye_ctrl and Eye_geo and Aim Constrain.
3.) Select Individual Both Eye_ctrl and Group it and Rename and Center Pivot.
4.) Select MasterEye_ctrl and Eye_ctrl (Parent Constrain)
5.) Select MasterEye_ctrl and group it itself an rename and change pivot to center itself.
6.) Now, Select UpperNeck_ctrl and MasterEye_ctrl and (Parent Constrain)
7.) Select UpperNeck_ctrl and Add Attribute
- Eye Lid (Displayable) [ L/R Tilt , L/R Upper , L/R Lower , L/R Blink ]
- Mouth (Displayable) [Left , Center , Right]
- Eye Brow (Displayable) [L/R In , L/R Mid , L/R Out ]

8.) Go to UpperNeck control to left -> select required attribute from UpperNeck control -> load the group from outliner which relates to the selected attribute.
• Select the attribute and click of the required axis of the group to get desired.
9.) Blend Shape ( Duplicate Mouth, Eye Brow)
- Remember some rules in Blend Shape
- Don't Delete history nor Freeze transform for the duplicate object
- Don't duplicate object for creating expression from the copy duplicate of the main on=bject
- Don't change the pivot for duplicate object or the master
Make 3 duplicate copies for creating the different shape.
10.)Change Shape in Duplicate

First, select Duplicate and then master or the main face and go to Blend Shape and its option change it front of chain.
11.) Go to UpperNeck control to left -> select required attribute from UpperNeck control -> load the Shape Node which relates to the selected attribute.
• Select the attribute and click of the required axis of the group to get desired.
12.) Limit the attribute values as per requirement.
13.) Lets clean Outliner

14.) Make Curve for Master_ctrl and Parent Constrain with Transform_grp.
Final Rig Output:-

Check Out the Concept Rig "CAMBOT" RIG TEST
CAMBOT | RIG | TEST
Comments are Welcome...!
Thanks for Watching!
Bye bye...!😜😉✌


Comments
Post a Comment