WOODEN TOY RIG - AUTOMATA - "POULTRY IN MOTION"
Hello Guys,
In this Third Assignment of RIGGING TECHNIQUES.
We are going to RIG a WOODEN TOY RIG - AUTOMATA - "POULTRY IN MOTION"
The Story of "Poultry in Motion"
It was inspired by an automata piece by Lisa Slater of the UK on the CMT website. It is designed so it can be wall mounted, something that I had been asked to consider in one of my designs. It has a simple operating mechanism, which is revealed by opening the nesting box doors. It has a nice folksy feel to it. Henrietta, Layla, Yolko, and Tandoori all dwell happily in their coop, laying eggs and gyrating for visitors who turn their crank.
In This Assignment My requirements are:
Crank should rotate with a control curve and it will control all the mechanism.
Mechanism:-
- Parent
- Expression Editor
- Node Editor
- Set Driven Key
In This Assignment, we are asked to create our own model with references....
so I choose "POULTRY IN MOTION" (click here to see reference video)
We begin with modeling as per reference and completed modeling process.
then we started to rig the wooden toy, which is automata!!! it runs with the mechanism so here I used Parent, Expression Editor, Node Editor and Set Driven key ... I used all these methods to complete my rig process.
First I created Control Curve to control Crank and I used orient constraint to connect curve to crank and I lock and hind all other nodes and I just keep Rotate Xaxis to control Crank.
Crank to Shaft orient constraint again it will make rotate for both crank and shaft with crank _ctrl.
Shaft to Cam again orient Constraint to rotate alone with the shaft.
So, If we rotate Crank_ctrl it will control ( crank, shaft, and cam)
As You can See I have 4 hen and it all works with the different mechanism.
First Mechanism(Hen1) it works with Parent Method.
1. Shaft - cam1 (Orient constraint)
2. now, we need to create locator(create-locator). we should create locator in center of the cam1
3. cam1 - locator1 (Parent constraint)
4. locator1 - follower1 (Parent constraint)
5. Follower1 - Hen1 (Parent)
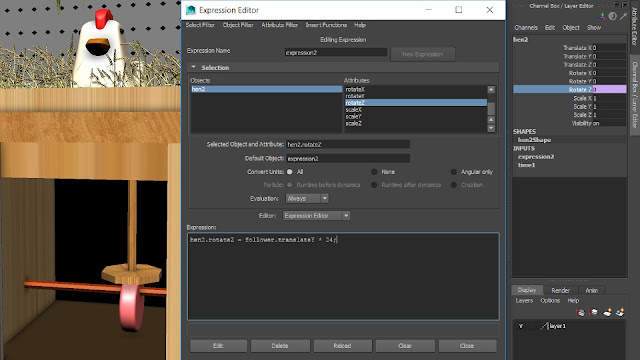
Second Mechanism (Hen2) it works with Expression Editor.
1. Shaft - cam2 (Orient constraint)
2. now, we need to create locator(create-locator). we should create locator in center of the cam
3. cam2 - locator2 (Parent constraint)
4. locator2 - follower2 (Parent constraint)
5. Now, we are going to use Expression Editor to connect follower2 to hen2
(Windows - Animation Editor - Expression Editor)
and type in Expression : hen2.rotateZ = follower2.translateY * 24;
Third Mechanism (Hen3) it works with Node Editor.
1. Shaft - cam3 (Orient constraint)
2. now, we need to create locator(create-locator). we should create locator in center of the cam
3. cam3 - locator3 (Parent constraint)
4. locator3 - follower3 (Parent constraint)
5. Now, we are going to use Node Editor with multipleDivide Node to connect follower3 to hen3
(windows - Node Editor) to get multipleDivide node...
First will select both nodes and make it full screen and Click on |TAB| and type "multiplyDivide" and enter to get the node and complete the command. Follower3 (translate Y output) to MultipleDivide Node (Input 1X) & (Output X) to Hen3 (Rotate X Input)
Fourth Mechanism (Hen4) it works with Driven Key.
1. Shaft - cam4 (Orient constraint)
2. Now, we are going to use Driven Key to connect follower4 to hen4
(In Animation Menu - Animate - Set Driven Key - Set... )
First I select cam4 and load Driver and then follower Load Driven and I started setting Key to Animate According to it Need.!! and Close
I wanted to loop the same Process again and again. So, I used Graph Editor(windows - animation editor - graph editor) to make it infinity(view in graph editor window) and I select all the Curves and I did pre infinity and post infinity ( CYCLE ) to make it loop Animation.
The Last step of Rigging it to Keep it Clean and Understand the OUTLINER.
Check Out..! Hope You Will Like It..!
The Final Output of Wooden Toy - Rig
Comments are Welcome...!
Thanks for Watching!
Bye bye...!😜😉✌


Comments
Post a Comment