Robot Rig - Tony v2.0
In this Second assignment of Character Rigging.
We are asked to rig a Robot.

Let's start rigging with Robot Rig.
Modeling is done by our Faculty.
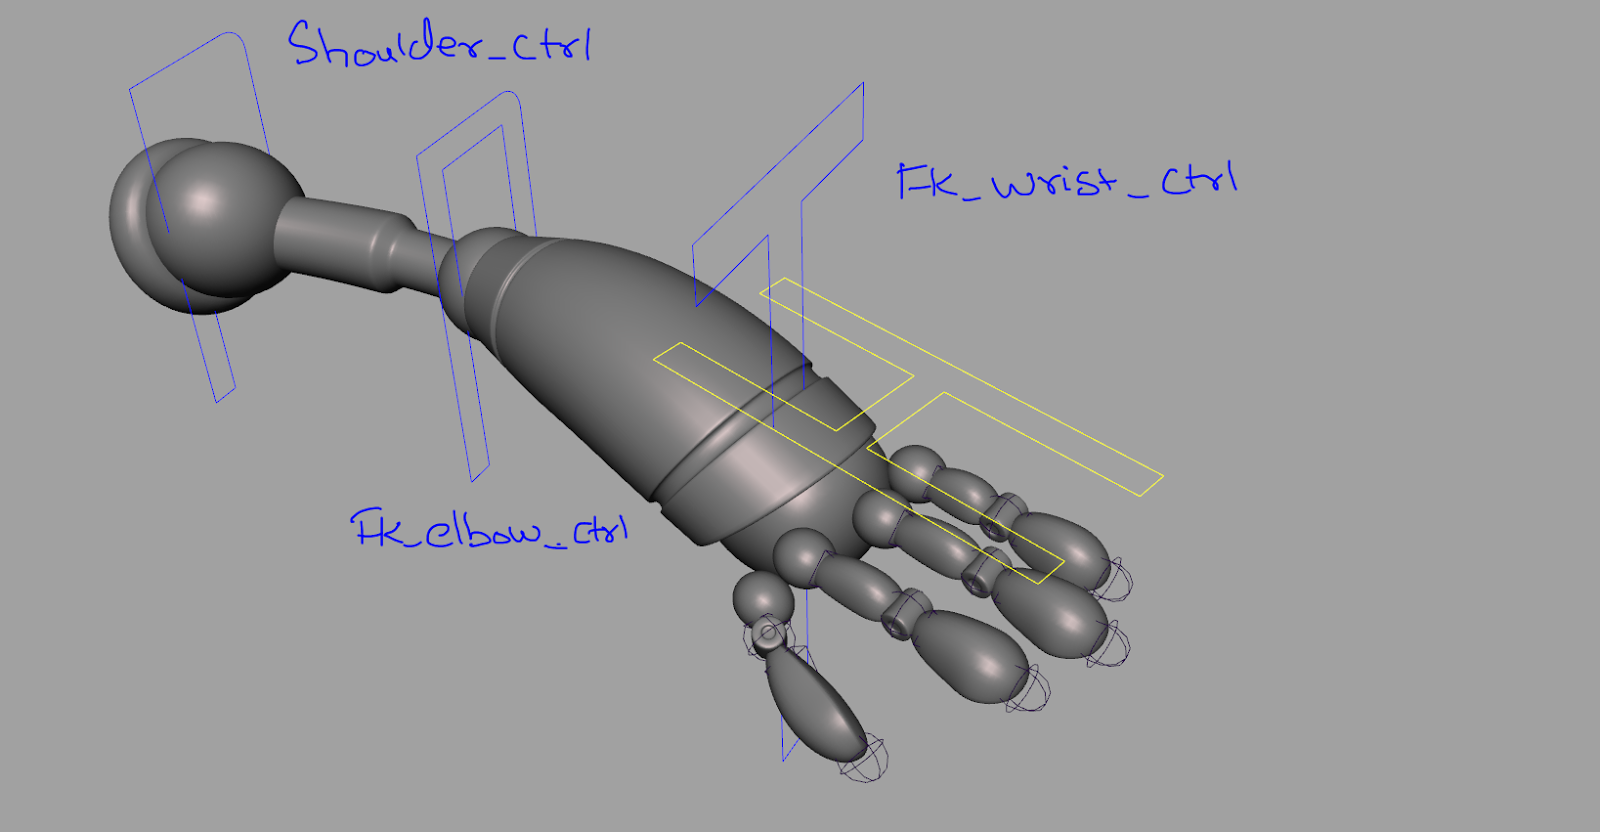
Let's Start With Hand - Rig [IK/FK Switch]
- we should create joints in center of geometry. So select joint tool and axis should be at XYY and start creating joints in center of the geometry.
- Check all the Rigging Rules...[ ►After creating joints we should check its LRA, x should be pointed towards its parent, Now we have start renaming joins according to the character.]

3.Create IK Setup
- RPS - shoulder jnt >> Wrist_jnt and named it as ( tony_wrist_IK)
- Create Curves to control
- IK_wrist_ctrl >> IK_wrist (point Constrain)
- Elbow_ctrl >> Wrist_ik (pole Vector)
- IK_wrist_ctrl to Wrist_jnt( orient Constrain)

4.Create FK Setup
- Create Curves
- Curves to its respective joint(orient Constrain)
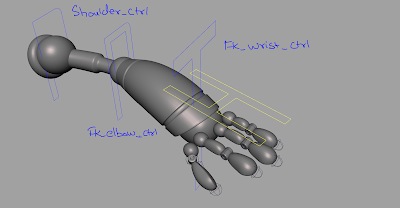
5.Create Common Ctrl and snap pivot to Wrist_jnt.
- Select common_ctrl group it and snap pivot to Wrist_jnt.
- Select Elbow_ctrl and group it to itself and snap pivot to Elbow_jnt
- Select FK_Wrist_ctrl and group it to itself and snap pivot to Wrist_jnt
6.Grouping
- Wrist_jnt to Common_ctrl_grp
- Shoulder_ctrl to Elbow_ctrl_grp
- Elbow_ctrl to FK_Wrist_ctrl_grp
7.Add following Attributes in Common_ctrl:-

8.Driven Key:-

- when IK is ON Common ctrl ( IK Blend will be 1)
- When IK is OFF Common ctrl ( IK Blend will be 0)
- When IK is ON Common ctrl ( IK Curves Visibility will be 1 and FK Curves 0)
- When IK is OFF Common ctrl ( IK Curves Visibility will be 0 and FK Curves 1)
9.Let's Connect attributes with exiting Jnt with Connection editor.
10.Create relationship b/w joints and Object (parent Constrain)

LEG - Rig [Joint Base Revers Foot Lock]
- we should create joints in center of geometry. So select joint tool and axis should be at XYY and start creating joints in center of the geometry.
- Check all the Rigging Rules...[ After creating joints we should check its LRA, x should be pointed towards its parent, Now we have start renaming joins according to the character.]

3. Create IK Handle:-
- RPS ( Hip_jnt to Ankel_jnt) name it as tony_R_Ankle_IK.
- SCS ( Ankle_jnt to Ball_jnt ) (Ball_jtn to Toe_jnt) and name it as tony_R_Ball_IK and tony_R_Toe_IK.
4. Create 2nd Joint Chain ( Reverse Foot Lock)

5. Parenting
- Ankle_IK >> Reverse_Ankle_jnt (P)
- Ball_IK >> Reverse_Ball_jnt (P)
- Toe_IK >> Reverse_Toe_jnt (P)
6.Create locater ---> group it to itself and snap it to Ball_jnt.
Select Ball_locater_grp ---> Reverse_toe_jnt (P)
Select Toe_IK ---> Ball_locator (P)
7."Bank Control"
- Create 2 locators ( 1st locator ---> snap to the left side of the foot )
- ( 2nd locator ---> snap to the right side of the foot )
- FootBase_jnt ---> 1st Locator (P)
- 1st Locator ---> 2nd Locator (P)
8.Create Foot_Ctrl and add following attributes.
 9.make a group of Reverse_FootBase_jnt
10.select Foot_ctrl ---> Reverse_FootBase_jnt (Parent Constrain).
11.KNEE(No Flip Leg Setup Method)
9.make a group of Reverse_FootBase_jnt
10.select Foot_ctrl ---> Reverse_FootBase_jnt (Parent Constrain).
11.KNEE(No Flip Leg Setup Method)
- Create the locator and group it to itself and snap it to Knee_jnt and Move it.
- select locator ---> Ankle_IK (Pole Vector)
- Select locator and snap it to Ankle_jnt
- Ankle_IK (Attributes) ---> Twist = 90`
- Locator ---> Foot_ctrl (P)
12.Let's Connect attributes with Exiting Joints.
13.Relationship B/W joints and Object (Parent Constrain)

Spine - Rig
- we should create joints in center of geometry. So select joint tool and axis should be at XYY and start creating joints in center of the geometry.
- Check all the Rigging Rules...[ After creating joints we should check its LRA, x should be pointed towards its parent, Now we have start renaming joins according to the character.]
 3.Create IK Spine Handle ( Root_jnt >> Chest_jnt)
- When we create IK Spine, CURVE will be Created.
- Curve will be Control by Vertices
- Vertices will be controlled by Cluster
- The cluster will Control Curves to animate Joints.
4.Select Curve(IK_Spine) Right Click!! Select Vertices and Then Again Right Click and Cluster.
5.Create Curves and Make relationship with Cluster
- Hisway_ctrl ---> root_cluster
- Spine_A_ctrl ---> Spine_A_Cluster
- Spine_B_ctrl ---> Spine_B_Cluster
- Chest_ctrl ---> Chest_Cluster
- LowerNeck_ctrl --->LowerNeck_Cluster
- UpperNeck_ctrl --->UpperNeck_Cluster

6.Grouping:-
- Select all the one by one and group it to itself and the change the pivot to its respective joints.
- Root_ctrl ---> Hisway_ctrl_grp
- Hisway_ctrl ---> Spine_A_ctrl_grp
- Spine_A_ctrl ---> Spine_B_ctrl_grp
- Spine_B_ctrl ---> Chest_ctrl_grp
- Chest_ctrl ---> LowerNeck_ctrl_grp
- LowerNeck_ctrl ---> UpperNeck_ctrl_grp
7.Select Spine_IK, Cluster, Curve >> Root (P)
8.Create Femur_jnt and snap it to Hip_jnt
- Select Femur_jnt >. hip_jnt (Parent Constrain)
- Select Both (L/R) Femur_jnt >> Hipway_ctrl (P)
9.Go to Connection Editor:-
- Chest_ctrl(roate Y) = IK_Spine(Twist)
- COG_ctrl(rotate Y) = IK_Spine(Roll)
10.Select Shoulder_ctrl ---> group it to itself.
- Chest_ctrl >> Shoulder_L_ctrl_grp (Parent Constrain)
- Chest_ctrl >> Shoulder_R_ctrl_grp (Parent Constrain)
11.Let's Re-Arrange the Outliner Properly with Creatting Different Groups...
- Joints_grp
- Curves_grp
- IK_grp
- DNT(Do Not Touch)_grp
12.Create Transform and Master control to controls the Complete Rig...!!
13.Select transform_ctrl and Transform_grp (Parent Constrain)
- Group it both transform_ctrl and Transform_grp and named it as Tony_Rig_grp
14.Select Master_ctrl and Transform_Rig_grp (Parent Constrain)
15.Lock and Hide - Non Usable Keys.
16.Limit All the Attributes......!!

- we should create joints in center of geometry. So select joint tool and axis should be at XYY and start creating joints in center of the geometry.
- Check all the Rigging Rules...[ ►After creating joints we should check its LRA, x should be pointed towards its parent, Now we have start renaming joins according to the character.]

3.Create IK Setup
- RPS - shoulder jnt >> Wrist_jnt and named it as ( tony_wrist_IK)
- Create Curves to control
- IK_wrist_ctrl >> IK_wrist (point Constrain)
- Elbow_ctrl >> Wrist_ik (pole Vector)
- IK_wrist_ctrl to Wrist_jnt( orient Constrain)

4.Create FK Setup
- Create Curves
- Curves to its respective joint(orient Constrain)
5.Create Common Ctrl and snap pivot to Wrist_jnt.
- Select common_ctrl group it and snap pivot to Wrist_jnt.
- Select Elbow_ctrl and group it to itself and snap pivot to Elbow_jnt
- Select FK_Wrist_ctrl and group it to itself and snap pivot to Wrist_jnt
6.Grouping
- Wrist_jnt to Common_ctrl_grp
- Shoulder_ctrl to Elbow_ctrl_grp
- Elbow_ctrl to FK_Wrist_ctrl_grp
7.Add following Attributes in Common_ctrl:-

8.Driven Key:-

- when IK is ON Common ctrl ( IK Blend will be 1)
- When IK is OFF Common ctrl ( IK Blend will be 0)
- When IK is ON Common ctrl ( IK Curves Visibility will be 1 and FK Curves 0)
- When IK is OFF Common ctrl ( IK Curves Visibility will be 0 and FK Curves 1)
9.Let's Connect attributes with exiting Jnt with Connection editor.
10.Create relationship b/w joints and Object (parent Constrain)

LEG - Rig [Joint Base Revers Foot Lock]
- we should create joints in center of geometry. So select joint tool and axis should be at XYY and start creating joints in center of the geometry.
- Check all the Rigging Rules...[ After creating joints we should check its LRA, x should be pointed towards its parent, Now we have start renaming joins according to the character.]

3. Create IK Handle:-
- RPS ( Hip_jnt to Ankel_jnt) name it as tony_R_Ankle_IK.
- SCS ( Ankle_jnt to Ball_jnt ) (Ball_jtn to Toe_jnt) and name it as tony_R_Ball_IK and tony_R_Toe_IK.
4. Create 2nd Joint Chain ( Reverse Foot Lock)

5. Parenting
- Ankle_IK >> Reverse_Ankle_jnt (P)
- Ball_IK >> Reverse_Ball_jnt (P)
- Toe_IK >> Reverse_Toe_jnt (P)
6.Create locater ---> group it to itself and snap it to Ball_jnt.
Select Ball_locater_grp ---> Reverse_toe_jnt (P)
Select Toe_IK ---> Ball_locator (P)
7."Bank Control"
- Create 2 locators ( 1st locator ---> snap to the left side of the foot )
- ( 2nd locator ---> snap to the right side of the foot )
- FootBase_jnt ---> 1st Locator (P)
- 1st Locator ---> 2nd Locator (P)
8.Create Foot_Ctrl and add following attributes.

9.make a group of Reverse_FootBase_jnt
10.select Foot_ctrl ---> Reverse_FootBase_jnt (Parent Constrain).
11.KNEE(No Flip Leg Setup Method)
- Create the locator and group it to itself and snap it to Knee_jnt and Move it.
- select locator ---> Ankle_IK (Pole Vector)
- Select locator and snap it to Ankle_jnt
- Ankle_IK (Attributes) ---> Twist = 90`
- Locator ---> Foot_ctrl (P)
12.Let's Connect attributes with Exiting Joints.
13.Relationship B/W joints and Object (Parent Constrain)

Spine - Rig
- we should create joints in center of geometry. So select joint tool and axis should be at XYY and start creating joints in center of the geometry.
- Check all the Rigging Rules...[ After creating joints we should check its LRA, x should be pointed towards its parent, Now we have start renaming joins according to the character.]

3.Create IK Spine Handle ( Root_jnt >> Chest_jnt)
- When we create IK Spine, CURVE will be Created.
- Curve will be Control by Vertices
- Vertices will be controlled by Cluster
- The cluster will Control Curves to animate Joints.
4.Select Curve(IK_Spine) Right Click!! Select Vertices and Then Again Right Click and Cluster.
5.Create Curves and Make relationship with Cluster
- Hisway_ctrl ---> root_cluster
- Spine_A_ctrl ---> Spine_A_Cluster
- Spine_B_ctrl ---> Spine_B_Cluster
- Chest_ctrl ---> Chest_Cluster
- LowerNeck_ctrl --->LowerNeck_Cluster
- UpperNeck_ctrl --->UpperNeck_Cluster

6.Grouping:-
- Select all the one by one and group it to itself and the change the pivot to its respective joints.
- Root_ctrl ---> Hisway_ctrl_grp
- Hisway_ctrl ---> Spine_A_ctrl_grp
- Spine_A_ctrl ---> Spine_B_ctrl_grp
- Spine_B_ctrl ---> Chest_ctrl_grp
- Chest_ctrl ---> LowerNeck_ctrl_grp
- LowerNeck_ctrl ---> UpperNeck_ctrl_grp
7.Select Spine_IK, Cluster, Curve >> Root (P)
8.Create Femur_jnt and snap it to Hip_jnt
- Select Femur_jnt >. hip_jnt (Parent Constrain)
- Select Both (L/R) Femur_jnt >> Hipway_ctrl (P)
9.Go to Connection Editor:-
- Chest_ctrl(roate Y) = IK_Spine(Twist)
- COG_ctrl(rotate Y) = IK_Spine(Roll)
10.Select Shoulder_ctrl ---> group it to itself.
- Chest_ctrl >> Shoulder_L_ctrl_grp (Parent Constrain)
- Chest_ctrl >> Shoulder_R_ctrl_grp (Parent Constrain)
11.Let's Re-Arrange the Outliner Properly with Creatting Different Groups...
- Joints_grp
- Curves_grp
- IK_grp
- DNT(Do Not Touch)_grp
12.Create Transform and Master control to controls the Complete Rig...!!
13.Select transform_ctrl and Transform_grp (Parent Constrain)
- Group it both transform_ctrl and Transform_grp and named it as Tony_Rig_grp
14.Select Master_ctrl and Transform_Rig_grp (Parent Constrain)
15.Lock and Hide - Non Usable Keys.
16.Limit All the Attributes......!!
16.Limit All the Attributes......!!

Check Out the Concept Rig "TONY v2.0" RIG TEST
TONY | RIG | TEST
Comments are Welcome...!
Thanks for Watching!
Bye bye...!😜😉✌
Comments
Post a Comment